In Email accounts you set the address from which ReFIS sends your e-mails - documents, replies to e-mails in unprocessed documents, and messages.
You will find them in the menu Other → User → Email accounts.
Until you have your own e-mail account set up in ReFIS, ReFIS sends your e-mails from its own address. The e-mail shows your name as the sender with the suffix “(via ReFIS)”, for example Jane Smith (via ReFIS), and replies go to your e-mail address (the Reply-To field is set to it).
With your own account the e-mail goes out directly from your address and the suffix “(via ReFIS)” is not added.
Adding an account
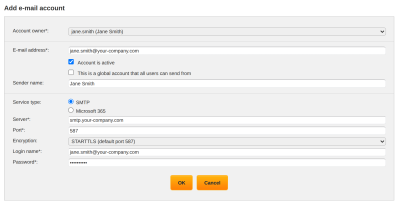
The “Add account” function opens the form:
- “E-mail address” - the address the e-mails will be sent from. Your address is filled in by default.
- “Sender name” - the name the recipient sees. Your name is filled in by default.
- “Account is active” - ReFIS does not use an inactive account.
- “Service type” - “SMTP” or “Microsoft 365”.
SMTP
For the “SMTP” type you fill in the details of the mail server, which your e-mail administrator gives you:
- “Server”
- “Port” - 587 by default
- “Encryption” - STARTTLS, SSL/TLS or “None”
- “Login name” and “Password”
You check whether ReFIS can connect to the server with the “Test connection” function in the list of accounts. The test only connects and logs in to the server, it does not send an e-mail.
Microsoft 365
If your company uses Microsoft 365, ReFIS sends e-mails directly through your mailbox and you also find the sent e-mails in its Sent Items:
- Add an account and in the “Service type” field choose “Microsoft 365”.
- Choose “OK and connect Microsoft 365”.
- Sign in to Microsoft 365 and grant ReFIS access.
ReFIS then shows “Microsoft 365 has been successfully connected.”
You can also connect the account later with the “Connect Microsoft 365” function in the list of accounts.
Shared mailbox
E-mails can also go out from a Microsoft 365 shared mailbox, for example invoices@your-company.com. A shared mailbox does not need a Microsoft 365 license. It is connected to ReFIS, however, by a user with their own licensed mailbox who has the “Send As” permission on the shared mailbox:
- The Microsoft 365 administrator grants the user the “Send As” permission on the shared mailbox.
- In ReFIS, add an account with the “Microsoft 365” type and enter the address of the shared mailbox in the “E-mail address” field.
- Choose “OK and connect Microsoft 365” and sign in as this user.
ReFIS keeps the shared mailbox address and reminds you that the signed-in user must have the “Send As” permission on it.
The recipient then sees the shared mailbox as the sender. By default, a copy of the sent e-mail is saved in the Sent Items of the user who connected the account, not in the shared mailbox. If you want it in the shared mailbox as well, the Microsoft 365 administrator switches this on for the shared mailbox (the MessageCopyForSentAsEnabled setting).
Global account
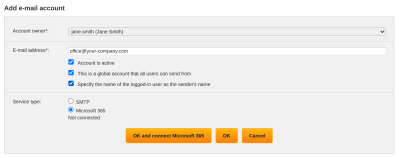
A user with full access can create an account for everyone by ticking “This is a global account that all users can send from”. Every user who does not have an active account of their own sends through the global account.
If they also tick “Specify the name of the logged-in user as the sender's name”, the e-mail goes out from the company address, the recipient sees the name of the person sending it as the sender, and replies go to that person's own address (the Reply-To field is set to it).
When e-mails stop being sent
If an e-mail cannot be sent through the account, you see the error in the list of accounts in the “Last error” column. ReFIS then does not send it from its own address either.
With the Microsoft 365 type the connection stops working, for example, after a password change or after access has been revoked. Connect the account again with the “Connect Microsoft 365” function.